Page 2 of 2 FirstFirst 12
Results 11 to 17 of 17

Thread: Follow-Along with RobA's Artistic Regional RPG Map

  1. #11

    Default

    Couldn't sleep. Gotta do this...


    ...I don't get it. I tried again making a map at 500x500 px so just about everything would be the same as Rob's. I get to the same step.

    Now we will turn the B/W into colour, by clicking Color->Map->Gradient Map, and the water is almost (for now).
    Okay. Looks good...

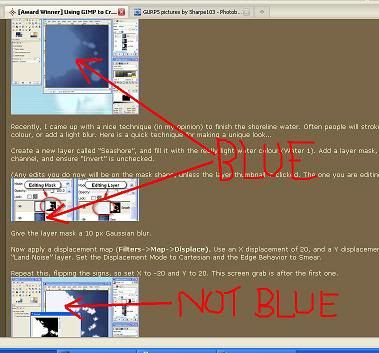
    Repeat this, flipping the signs, so set X to -20 and Y to 20. This screen grab is after the first one.
    But, the screen grab is white. I can't figure out why. Mine is all blue and so is the screen grabs in the tut up until that point.


    Here's what mine looks like: http://i852.photobucket.com/albums/a...URPS/again.jpg

    It's blue and there's no shore line. I just can't figure it out. Probably because I'm super sleepy.

    Now that the ocean is completed, the land can be build up. Create a cop of the “Sea Shape” layer and name it “Grass”. Create a layer mask using the “Land Mask”channel. Click on the layer icon so we now edit the layer, not the mask.
    I copied the Sea Shape layer like the tut says, then moved it up to the top of the layers because Rob's is.

    Mine looks okay so far, not quite as good. If I could figure out what I'm doing wrong on the Seashore layer, it would look much closer to Rob's. Here's a screen shot: http://i852.photobucket.com/albums/a...S/seashore.jpg

    Post 9:Finishing the Land.

    After the bump map we now have this. You can adjust the opacity of the bump map to make it less noticeable if desired:
    I pretty well do, again, except for the coast: http://i852.photobucket.com/albums/a...ttingthere.jpg

    I'm going to keep at this...

  2. #12

    Default

    After the bump map we now have this. You can adjust the opacity of the bump map to make it less noticeable if desired:
    I did. Knocked it down to 43%.

    Merge down the difference layer, invert it, then bring up the layers dialog and adjust it to be a wider band of white on black. This will be used as the layer mask for the dirt….
    Awww, crap! I was blowing through the steps until we got to that dang histogram looking thing again...

    NO idea what this means, so i just moved the three little arrows close together in the middle, kind of like Rob's example pic.

    Go back to the Dirt Layer and add a layer mask, using the “Land Mask” channel. Now right click on the layer mask and select “Apply layer”. This will erase everything that is not above the land.
    Not for me. I was surprised when nothing happened.

    http://i852.photobucket.com/albums/a...notherwall.jpg

  3. #13

  4. #14
    Guild Artisan geamon's Avatar
    Join Date
    May 2009
    Location
    Bronx, NY
    Posts
    616

    Default

    Pretty simple your Sea Shore layer is filled with blue (RobA's isn't), aside from that the masks and everything are fine as far as I can tell. So just select that layer make sure you aren't editing the mask for the layer and fill it with with white usually it's set as the BG color as default.
    Cheers, Julien

    Battlemaps, Town Maps, Tutorials.
    All my maps and content are posted and published under this Creative Commons License. Click Here for information on licensing.

  5. #15

    Default

    HI -

    Just a comment on your first few posts. The map you start with already has much coastal detail. The proces of blurring and adding in noise is for when you don't have that detail! There is little value in doing it if you have a detailed shape you are trying to maintain. In such a case, check out Old Guy's tutorial: http://www.cartographersguild.com/showthread.php?9056

    -Rob A>

  6. #16
    Guild Journeyer hohum's Avatar
    Join Date
    May 2009
    Location
    Phoenix, AZ
    Posts
    166
    Blog Entries
    3

    Default

    Hi Sharpe, I will re-iterate what RobA just said. I too tried his tutorial with a predefined coastal shape. If you follow the steps with all the blurs you will wipe out your predefined coast rather than fractalize it. I haven't tried old guys method specifically, but something like it. I think I see what is going on with your coastal smear issue. Right under where you wrote "BLUE" is the key. It says: "Create a new layer called Seashore and fill with lightest water color (water 1) add layer mask and make sure invert is not selected". So my guess is that you didn't fill a layer with the light water color, didn't add or added the wrong mask. See if that helps.

    {EDIT}
    You might also post a screen cap of your layers dialog or just the xcf file if we are not giving you the right directions.
    Last edited by hohum; 10-18-2010 at 04:55 PM. Reason: Another thought.

  7. #17

    Default

    I tried again to faithfully recreate the 1986 Dragon Warrior 1 map and think I've gotten somewhere this time.

    Click image for larger version. 

Name:	dragon_warrior1.jpg 
Views:	459 
Size:	230.3 KB 
ID:	30675


    This is with the original map at 10% opacity so you can see just how surprisingly close it is to the original:
    Click image for larger version. 

Name:	dragon_warrior1b.jpg 
Views:	328 
Size:	708.6 KB 
ID:	30676

    Time to start in on the mountains... I'll place them reminiscent of the Nintendo map, without sacrificing too much realism.

Page 2 of 2 FirstFirst 12

Posting Permissions

  • You may not post new threads
  • You may not post replies
  • You may not post attachments
  • You may not edit your posts
  •