Page 1 of 2 12 LastLast
Results 1 to 10 of 12

Thread: Scaling and fitting of two adjoining elevation maps

  1. #1
    Guild Member Akubra's Avatar
    Join Date
    May 2014
    Location
    Belgium
    Posts
    88

    Default Scaling and fitting of two adjoining elevation maps

    I’m thinking of creating some elevation maps of Rautah, the planet I’m building. I want to have small scale maps (one of the planet and then one or two per continent), but I also would like large scale maps that could possibly be the start of a topographic atlas.

    There are a few very good tutorials explaining how to create realistic elevation/topographic maps, but once I have one type of map, how do I make the other type?

    As far as I can see there are two approaches:

    1. A top-down approach: starting with a small scale map, and use it as a base for the large scale maps. But two problems arise here:
      • Scaling - I can’t just cut the small scale map in pieces and enlarge them. The terrain resolution would be horrible. Adapting the maps manually and letting Wilbur manipulate them to add some realism could be a conceivable solution to adjust this problem, although the manual interventions would be very tedious, and it would make the next problem worse.
      • Fitting - How do I make sure that two adjoining large scale maps fit at their edges? After passing them through Wilbur they won’t fit seamlessly.

    2. A bottom-up approach: starting with the large scale maps and creating the small scale map by reducing their size and combining them. This would probably solve the scaling problem, but not the fitting problem. And of course, if following this approach, it would take much longer to produce a small scale map.


    So the main question is how do I make two adjoining maps fit nicely together. Has anybody tried this before with good results? I’ve been thinking about this for some time and I can’t figure it out. I'd be very grateful if someone can help me out on this.

    Cheers - Akubra

    FYI: I have GIMP, Inkscape, Wilbur and I have recently downloaded QGIS, but I have never used it. If there is a solution with any of these that would be an extra bonus! If not, it will be an extra drive to learn something new.
    Last edited by Akubra; 09-06-2015 at 07:46 AM.
    “I am an agnostic on most matters of faith, but on the subject of maps I have always been a true believer. It is on the map, therefore it is, and I am.”
    ― Tony Horwitz, One for the Road: An Outback Adventure

  2. #2

    Default

    I think you should look into the Middle Earth DEM project to see how they handled the problem. Be forewarned, though: It was a multi-year project with at least a little bit of custom software written specifically to address the problems they were solving. Still, some of the tools developed there might be adaptable into something you could use. Redrobes was heavily involved, and I think monks, if I recall correctly.
    Bryan Ray, visual effects artist
    http://www.bryanray.name

  3. #3
    Guild Adept groovey's Avatar
    Join Date
    Apr 2014
    Location
    Spain
    Posts
    256

    Default

    I have the same idea Akubra, and I opted to take care of the world map first and then use it as the guide to do regional maps. Of course, since I'm still not done with the world map, I'm still not sure how I'll manage to make the regional maps fit once they overlap.

  4. #4
    Guild Member Akubra's Avatar
    Join Date
    May 2014
    Location
    Belgium
    Posts
    88

    Default

    Thank you both for your comments!

    Midgardsormr, I started reading the Middle Earth DEM Project thread (a long one!) which is very interesting. I also downloaded the free versions of World Machine and Terragen and watched some videos to see what you can achieve with them. Apparently, in World Machine you can work with "unlimited" tiles, and I wonder if that could be a solution. Unfortunately, that's only possible in the Pro (= paid ) version. I'll have to read up on it, maybe there are other possibilities when combining different programs.

    groovey, I'm really undecided about it. I agree that the top-down option (your choice) would be the most logical, and I would really prefer it. The bottom-up option is certainly much more time consuming as you need the large-scale maps before you can begin with the small scale ones. But for both options the fitting/overlapping problem has to be solved first, or I should at least have an idea how to solve it. I don't want to do a lot of work just to discover that I took a dead-end street... Maybe the software I mentioned above offers a solution.

    Cheers - Akubra
    “I am an agnostic on most matters of faith, but on the subject of maps I have always been a true believer. It is on the map, therefore it is, and I am.”
    ― Tony Horwitz, One for the Road: An Outback Adventure

  5. #5

    Default

    There is also a tutorial or case study around here somewhere by HandsomeRob, who was making a very detailed atlas of his world. He's a real-world cartographer by trade, though, so I think he was using some expensive professional tools. Even so, there might be some information you can glean from it.
    Bryan Ray, visual effects artist
    http://www.bryanray.name

  6. #6
    Guild Member Akubra's Avatar
    Join Date
    May 2014
    Location
    Belgium
    Posts
    88

    Default

    Thanks for your valuable advise, Midgardsormr. I've had a look at HandsomeRob's case study, and it does indeed contain helpful information to make such maps.

    Cheers - Akubra
    “I am an agnostic on most matters of faith, but on the subject of maps I have always been a true believer. It is on the map, therefore it is, and I am.”
    ― Tony Horwitz, One for the Road: An Outback Adventure

  7. #7
    Guild Artisan Pixie's Avatar
    Join Date
    Jan 2014
    Location
    Lisbon
    Posts
    939

    Default

    I haven't tried it but there's a possible solution that I have been entertaining in my mind, Akubra, concerning the merging of different local maps "worked" on Wilbur.

    First off, do the local maps with the highest possible concern about fitting - that means, make sure rivers flow in the same direction, that ridges have aproximately the same height, etc.
    Then merge them all in a big map. The fitting will fail, of course, the borders of each plot will be very visible.

    Now, select and copy new plots, but center each of those plots on the corners of the previous ones. Go back to Wilbur and make a round selection, centered where the corners meet (the center of the new plot) and make that selection feathered so that it reaches the N,S,E,W borders of the new plot, but alters them only very slightly.

    Apply subtle erosion to that selection only, mainly precipitation based and filling basins. When the new plots are rejoined their borders were noly slightly changed and they were already fitting as they were the centers of the original work. As I said, I never tried this and I'm sure it is a time-heavy strategy... I just thought I could share.. If you ever try it, please post your results. If I ever try it, I will

  8. #8
    Guild Expert johnvanvliet's Avatar
    Join Date
    Jul 2012
    Location
    N 42.39 W 83.44
    Posts
    1,091
    Blog Entries
    4

    Default

    you can look into how the scientific community handles this

    AMES Stereopipline uses 3d "point clouds" then merges the point clouds
    then as a last step grids the non gridded data and outputs a tiff

    meshlab dose a great job of blending point clouds and runs on microsoft OS's

    now you will have issues with using any version of Gimp under 2.9.1 ( git clone git://git.gnome.org/gimp )

    the 2.8 is only 8 bit image depth

    the development version uses GEGL and is 32 bit image depth

    depending on the resolution you need
    any decent modern computer can work with a 16 bit signed integer 256 or 512 pixels per degree height map
    (256 ppd = 92,160 x 46,080 , 512 ppd =184,320 x 92,160 )

    i work with those sizes on a 5 year old mid range desktop - i5cpu and 8 gig ram
    and worked with 128 and 256 ppd images on a 14 year old pentuim 4 with 512 meg ( upped to 1 gig ) of ram
    --- 90 seconds to Midnight ---
    --------

    --- Penguin power!!! ---


  9. #9
    Guild Expert johnvanvliet's Avatar
    Join Date
    Jul 2012
    Location
    N 42.39 W 83.44
    Posts
    1,091
    Blog Entries
    4

    Default

    you can also synthetically add detail and upscale

    but you will need to reblend the images back in

    working with 16 and 32 bit data can be fun
    it is VERY hard to see 16 bit data on a RGB12 bit lcd screen ( 4 bit for each red ,green,blue)

    i use a "emboss" filter to show me the errors and how things are going

    a friend of mine needed help getting this data of a supper volcano Caldera data into a 3d mesh -- so i have it sitting around
    ( the software used is "Nip2" it runs on Linux ,Apple,and Microsoft )


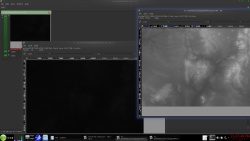
    the minimum pixel value is 1484 and the MAX pixel value is 3992 -- A VERY DARK IMAGE for data from -32768 to +32768

    that black looking image IS THE CORRECT viewing setting the image on the right is exaggerated for viewing

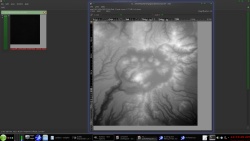
    a 1600x1600 crop of the center


    i like the command line tool "G'Mic"
    -- this upscales it 2X -
    ( the software used is "G'mic" it runs on Linux ,Apple,and Microsoft )
    Code:
    gmic crop2.tiff -noise 0.1%,0 -div 256 -upscale_smart 3200,3200,1,0.5,0.1,1 -to_gray  -mul 256  -o crop2_2x.tiff
    ---
    ( this output is in 32 bit float to save it as a 16 bit UNSIGNED integer -see below )
    ----
    gmic crop2.tiff -noise 0.1%,0 -div 256 -upscale_smart 3200,3200,1,0.5,0.1,1 -to_gray  -mul 256  -o crop2_2x.tiff,ushort

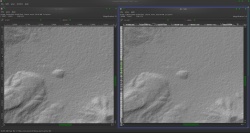
    now seeing as it is very hard to make out details in 16 bit data i use a emboss to show the changes

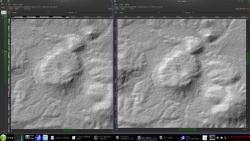
    the image on the left is the UPSCALED to TWICE the size image -- on the right is the original


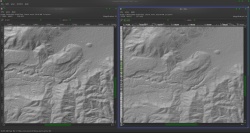
    this works fairly well up to about 8X after that ????????????


    then to blend it back in
    just shrink the image and using layers ,paste the new on top of the old and use a fuzzy paint brush for the eraser tool to blend the two layers

    -- added later
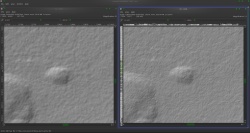
    a 8x enlargement synthetically added detail
    -- original is on the left ,the enlargement is on the right
    Last edited by johnvanvliet; 09-11-2015 at 04:27 PM.
    --- 90 seconds to Midnight ---
    --------

    --- Penguin power!!! ---


  10. #10
    Guild Member Akubra's Avatar
    Join Date
    May 2014
    Location
    Belgium
    Posts
    88

    Default

    Pixie and johnvanvliet, thank you both for all this information.

    @Pixie: I'll have to try out your solution, Pixie. It might just do the trick! The only thing I could come up with was blending overlapping borders in GIMP, but that had a fuzzy outcome, as I had expected. I was also thinking of drawing the local maps with an extra "slice" (say a few hundred pixels) on the sides. Then cutting/pasting those slices as a new image and using that as a base for the next map, but without altering anything at the border where the slice was cut off. And that for every map. I haven't tried it yet and I don't know if it could work.

    @johnvanvliet: I am an absolute amateur in these matters so I'm very glad that you have mentioned the concept of "point clouds". I was vaguely aware of its existence, but it definitely looks like an interesting concept, and one that I can use. I have downloaded MeshLab, and I am aware of some tutorials to learn the basics. It does seem that there is no real manual. Do you know of any? Many thanks too for the images you've uploaded to illustrate your explanations. Much appreciated! All this will have to sink in a little though...

    Cheers - Akubra
    Last edited by Akubra; 09-11-2015 at 04:49 AM. Reason: forgot a crucial word...
    “I am an agnostic on most matters of faith, but on the subject of maps I have always been a true believer. It is on the map, therefore it is, and I am.”
    ― Tony Horwitz, One for the Road: An Outback Adventure

Page 1 of 2 12 LastLast

Posting Permissions

  • You may not post new threads
  • You may not post replies
  • You may not post attachments
  • You may not edit your posts
  •