

 Reply With Quote
Nice and easy. here is what I got after 30 min of fiddling and retrying stuff...Added a 5px blur after the Iwarp, but I think it makes things a bit grainy for some reason
Repped and rated


Hello, here is my first tutorial, explains about the creation of Gas Planets in GIMP, since there is no tutorial about Gas Planets for GIMP (only Photoshop) it's very simple, lets get started
1. Create a image of 1700x1700 and 150 of resolution
2. Fill the background with Black
3. Create a new layer and name it "Planet Gradient"
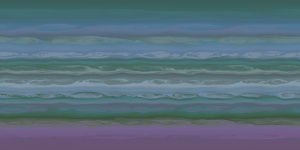
4. Select the gradient you want for your planet (I used a gradient of blue tones) and add it to the "Planet Gradient" layer, and you'll have something like this
5. Go to Filters -> Distorts -> Ripple
Check Antialiasing, Horizontal, Smear and Sine
Add the next values
Period: 200
Amplitude: 5
Phase shift: 53
You'll have something like this
6. Now this is the part where you need to be creativesince there's no specifics rules to follow, go to Filters -> Distorts -> IWarp
In this case, I only played with the Move, Grow, Shrink and Swirl (both CW and CCW) controls, you can also adjust the Deform Ratius/Deform Ammount to adjust the effects, If you're not satisfied with the first results, just click Reset and try again
Before use IWarp, I suggest you duplicate the layer
Here's an example of what you should have
7. This is only optional, in my case I added and seamless rock texture to add some rough aspect to my planet, I used this texture
Set the layer mode to "Soft Light" and Opacity to 25%, and you'll have this, you can't notice the difference because of the size (423x423)
8. Now lets spherize the texture, go to Filters -> Distorts -> Apply Lens with Lens refraction index in 1.40
9. Resize the spherized texture by going to Layer -> Scale Layer, set the Width and Height to 1500
10. Now lets create a ellipse selection, In the Toolbox click on the Ellipse Select icon, make a small selection in yor layer, then in the Tool Options panel, set Position 500 and 0, and Size 1700 and 1700
11. Without eliminating the ellipse selection, create a new layer and name it "Shadow"
12. Select the "Shadow" layer and fill it with Black, here's what you'll have
13. Now you can eliminate the ellipse selection by going to Select -> None
14. Keep the "Shadow" layer active, and go to Filters -> Blur -> Gaussian Blur, set Horizontal and Vertical values to 250,0 and Blur Method to RLE
15. And the final step and also optional, set the "Shadow" layer opacity to 75%, here's a preview
I hope this tutorial helps you with your work, if you have any question, please let me know and I'll gladly answer, soon I'll post the Nebula tutorial
Have a good day
Last edited by JCRL; 03-13-2016 at 06:27 PM.


Nice and easy. here is what I got after 30 min of fiddling and retrying stuff...Added a 5px blur after the Iwarp, but I think it makes things a bit grainy for some reason
Repped and rated
Art Critic = Someone with the Eye of an Artist, Words of a Bard, and the Talent of a Rock.
Please take my critiques as someone who Wishes he had the Talent
looking very good and very easy to follow - good work
regs tilt
:: My DnD page Encounter Depot free stuff for your game :: My work page Catapult ::
:: Finished Maps :: Competion maps - The Island of Dr. Rorshach ::
:: FREE Tiles - Compasses :: Other Taking a commision - Copyright & Creative Commons ::
Works under CC licence unless mentioned otherwise
though iwarp is a rather cool tool
there is a inherent issue of making a image that maps to a CYLINDER and dose NOT map to a SPHERE
for gas giants i have been using "Gaseous Giganticus"
a part of Space: Nerds in space "
( i still say in my head " pigssss inNNNN SPACE!!!! " -- think ms. piggy )
"http://smcameron.github.io/space-nerds-in-space/"
the source
https://github.com/smcameron/space-nerds-in-space
an example
http://www.cartographersguild.com/entry.php?b=147
--- 90 seconds to Midnight ---
--------
--- Penguin power!!! ---
Hello, all.
I have created a PDF tutorial of JCRL's Gas Planet Tutorial in Gimp. It can be found in Post #1 of the Tutorials in PDF Format thread.
Enjoy!
In the end you will see, you is you and me is me.
© May 29, 1980
 Posting Permissions

