Results 1 to 8 of 8

Thread: need some tips on how to make natural heightmaps

  1. #1

    Default need some tips on how to make natural heightmaps

    Hi all, I'm new here. I recently registered after seeing some amazing maps at the site gallery. However, I have questions regarding on how to make natural looking mountain heightmaps in Photoshop alone. Most tutorials out in the net normally exploit the use of cloud filters but that leads to randomization instead of the desired terrain one wants.


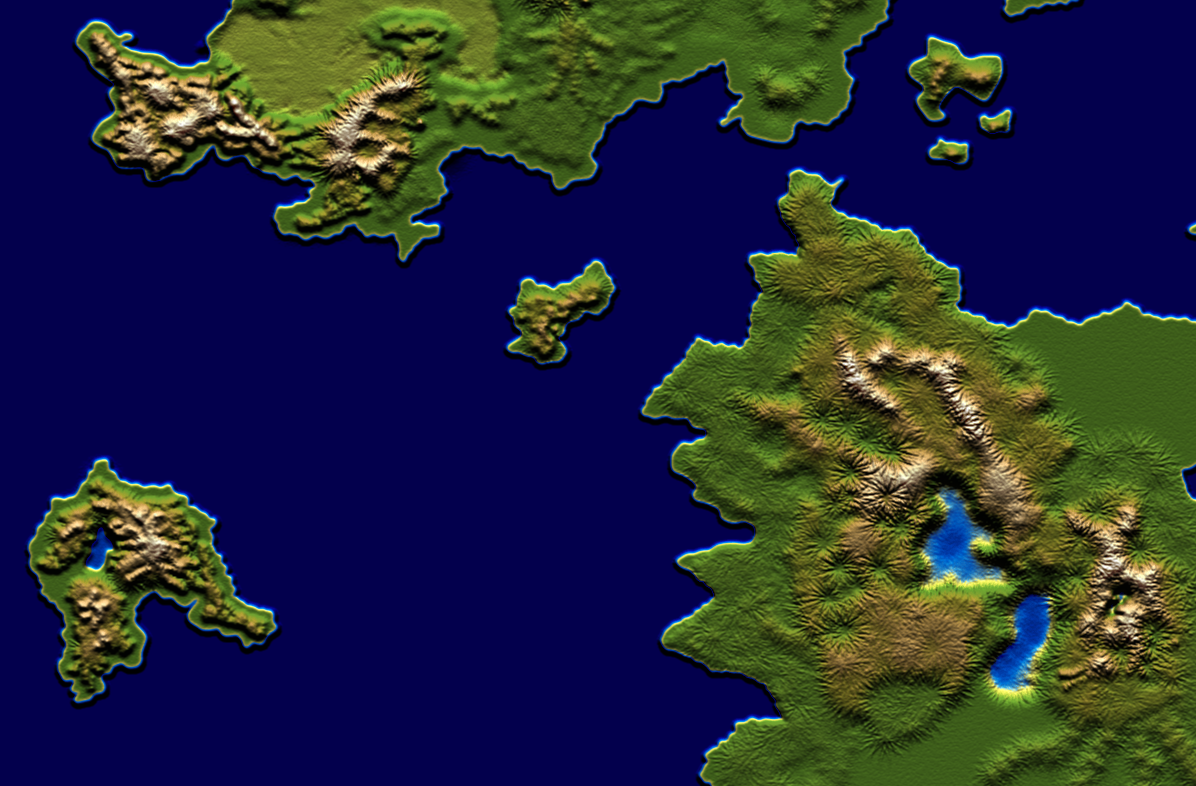
    My first shot at manual greyscale height mapping with gradient map applied but not satisfied with the results.
    I mainly need tips on how to draw sharp peaks in heightmaps but also how to draw more natural terrain effects
    in photoshop alone without the use of existing DEMs and external software.

    ~ Roaches
    Last edited by Roaches; 01-02-2011 at 03:56 AM.

  2. #2
    Community Leader Facebook Connected Ascension's Avatar
    Join Date
    Jun 2008
    Location
    St. Charles, Missouri, United States
    Posts
    8,392

    Default

    The way that I do it is to use the clouds filter, then lighting effects, delete the darks, then use the lasso tool (with a feather of 50) and just grab a chunk of mountain and drag it to where I want it. It's not a true DEM but it lets me put mountains where I want them despite starting out totally random. Hand-painting a DEM in PS is a very long and tedious process - I've never had the patience to actually finish one.
    If the radiance of a thousand suns was to burst at once into the sky, that would be like the splendor of the Mighty One...I am become Death, the Shatterer of worlds.
    -J. Robert Oppenheimer (father of the atom bomb) alluding to The Bhagavad Gita (Chapter 11, Verse 32)


    My Maps ~ My Brushes ~ My Tutorials ~ My Challenge Maps

  3. #3
    Guild Artisan su_liam's Avatar
    Join Date
    Aug 2007
    Location
    Port Alberta, Regina(IRL: Eugene, OR)
    Posts
    798

    Default

    I have a couple of tutorials up that go in that direction. These are both pretty old and I probably need to put together a tutorial describing where my techniques have gone since. Noise is an important part of every good technique I've found for modelling a good natural-looking heightfield. The key is controlling where the noise goes and how much goes there.

    You may find the ridge heightmap tutorial a good fit for your needs, and the Burpwallow noise editing technique is one I still use on occasion for some purposes.

    I use Wilbur a lot any more for actual drawing of the heightfield and it's free if you can run Windows on your computer. Even if I wanted to do most of my painting work in PS, I'd still want to use the distance modification for selections pretty frequently and some sort of erosion filter is pretty crucial.

    Even with Wilbur, I'm still seeking a technique that provides really realistic effects in less than a full days work, though. I find it difficult to meet my own standards.

    For small-scale maps of large regions, it's not a bad idea to vary your technique. There are places that would be really very well represented by your map above.

    Another thing to think about, starting with a map like the one you show above is to raise it up with progressively smaller soft brushes to bring out the sharp ridges.

    1. Start with a black background. I won't show an image for this.

    2. With a large soft brush on a fairly low basic opacity and with opacity control and size control set to Pen Pressure, sketch in the broad areas of your ridged areas in a medium grey color. I also set jitter for size and opacity with greater variation in size than opacity.
    step1.jpg
    2a. You can also use more a interesting brush shape for better effects. This needs several passes and a bit of gaussian blur.
    step2a.jpg

    3. Reduce the size of your brush. and make passes over desired high places. While your doing this, also sketch in lesser parallel and tributary ridges. I'll use the simpler brush example for this.
    Maybe blur a touch to rinse and repeat with progressively smaller brushes.
    step3.jpg

    4. After doing step three several times with smaller and smaller brushes change to a grungier brush tip shape in the same small size you used last or a bit smaller. Use this brush and a much brighter grey color to sketch in the sharp mountain tops. Multiple passes at low opacity is a good idea. Don't forget to pullup the occasional tributary and parallel ridge. Remember, low opacity and multiple passes is your friend. A slightly unsteady hand isn't a bad thing either.
    step4.jpg

    (5. You could add a bit of noise at this point for a more naturalistic look. This was all done on one layer which is a bit of a no-no. Layers allow you to go back and alter things. Also, you can alter the effect a bit by changing blend modes and even masking strokes out partially or altogether. I'm going to skip all of this, for the purposes of this little essay.

    6. Use a levels effects layer to make your heightfield span from approximately black to almost white. This will make the next layer work better.

    7. Add a gradient map layer effect. Choose a gradient that looks good to you. Maybe a little bit less subtle than you'll like in the final image because the layer tends to tone down colors.
    step7.jpg

    8. Create another layer on the top, fill it with white, set the blend mode to multiply. This should wind up looking like it did nothing.

    9. Turn off the gradient map layer. Select All. Copy merged. Create a new channel, call it elevations. Paste into elevations. Go back to the top LAYER.

    10. Make sure that the gradient map layer is visible and that the top layer is selected. Now Go to Filter>Render>Lighting Effects... Light Type should be directional. Move the white dot up so that you can grab the grey dot at the other end of the stick. Move the grey dot up so that it is to the upper left of the white dot(about 270º azimuth). Set texture channel to elevations. Adjust the dot's position, lighting slider and properties sliders till you have something you like. I set ambience to 30 and intensity to 35height to 35; otherwise pretty much default. Click Okay.

    I'll save the image for another post.
    Last edited by su_liam; 01-03-2011 at 03:54 PM. Reason: A little added "something"

  4. #4
    Guild Artisan su_liam's Avatar
    Join Date
    Aug 2007
    Location
    Port Alberta, Regina(IRL: Eugene, OR)
    Posts
    798

    Default

    step10.jpg
    Whoa. A bit much. Lets try reducing opacity on the top layer a bit.
    step10-1.jpg
    Best I could do. Not great. You can see I haven't done this in awhile. But the ridge on the far left and the mountain at the bottom came out pretty well.

    Changing the gradient map a bit and setting the hillshade's blend mode to soft light had good effects, I think.
    step10-2.jpg

    A bit of experimentation and you could do a lot better than this. I'd tone down the parallel ridges a bit. Some were clearly too high.

    I did try adjusting the colors a bit with that last image.
    (step11).jpg

    Not great, but not too bad. Could be used as a hillshade layer in its own right. This took about two hours of which about 45 minutes was spent actually working on photoshop the rest was adjusting Save for Web, saving uploading and writing.

    With a bit of practice and less time spent trying to explain the process you could likely get some good ridges in about half an hour. Better results could be had if you build up your terrain in layers(Man I wish Wilbur had layers or at least that the Apply Image filter worked with Virtual Terrain .bt).

    Edit: Had a try with better sketch work.
    final-try.jpg
    Last edited by su_liam; 01-03-2011 at 04:42 PM.

  5. #5
    Administrator waldronate's Avatar
    Join Date
    Mar 2007
    Location
    The High Desert
    Posts
    3,605

    Default

    Quote Originally Posted by su_liam View Post
    Man I wish Wilbur had layers
    I also wish it was so.

  6. #6
    Guild Artisan su_liam's Avatar
    Join Date
    Aug 2007
    Location
    Port Alberta, Regina(IRL: Eugene, OR)
    Posts
    798

    Default

    Upgrading Apply Image would work in a pinch

  7. #7
    Guild Novice MeiLin's Avatar
    Join Date
    May 2011
    Location
    Portland, OR
    Posts
    13

    Default

    OMG THANK YOU. I have been bashing my head against my mountains so to speak, and this method makes sense.

  8. #8
    Administrator waldronate's Avatar
    Join Date
    Mar 2007
    Location
    The High Desert
    Posts
    3,605

    Default

    Quote Originally Posted by su_liam View Post
    Upgrading Apply Image would work in a pinch
    I just noticed this one. How would you like it upgraded?

Posting Permissions

  • You may not post new threads
  • You may not post replies
  • You may not post attachments
  • You may not edit your posts
  •