Results 1 to 10 of 17

Thread: Follow-Along with RobA's Artistic Regional RPG Map

Hybrid View

Previous Post Previous Post   Next Post Next Post
  1. #1

    Default

    ....Okay, I'm not done.

    I went back to where things started to go wrong.

    Now Invert the selection (Select->Invert), create a new BLACK layer called “Land Mask” and fill the selection with white. Now save the selection to a Channel (Select->Save to Channel) and rename the channel to “Land Mask”. This will be used a fit bit later.
    There's where things might have went haywire for me.

    Before, I created a transparent layer and filled the selection with white. This time around, I created a layer with a Layer Fill Type set to background color (which is black). Then, I filled the inverted selection (the landmasses) with white.

    Now it looks more like Rob's. Here's a screen shot: http://i852.photobucket.com/albums/a...URPS/mask2.jpg

    The only issue I see is that my coastline is completely razor straight and flat...

    But, I want to see how this goes so I'm not going to worry about that right now.

  2. #2

    Default

    To make the ocean/water (and the base contour for the land as well) a two layer variant of the three layer sandwich will be used.
    Copy the “Land Mask” Layer, and rename it “Sea Shape”. Apply a Gaussian Blur (Filter->Blue->Gaussian Blur) large enough to eliminate the absolute black and whites of the image. In this case, I used the same size as the image (500px).
    I still don't know what that means, but I can read the pictures just fine.

    I think (hope) this looks pretty close: http://i852.photobucket.com/albums/a...GURPS/blur.jpg

    Quote Originally Posted by RobA View Post
    Layer masks act like filters that let parts of the image “show though”. Areas where the mask is white will allow the layer to be visible. Areas where the mask is black will be transparent, and the various shades of grey will be varying degrees of transparency. Now right click on the “Sea” layer and select “Apply Layer Mask”. This will remove pieces of the layer based on what was showing through the layer mask. Here I have made all the other layers invisible to see the result:
    Attachment 1440
    Hey! Hey!!! I think mine looks a lot like Rob's! Screen shot: http://i852.photobucket.com/albums/a...gsomewhere.jpg

    Also, check out the histogram….that is where we start next.
    Oh, boy. Here Rob goes with that damn histogram again... XD

  3. #3

    Default

    Now we want to stretch out the colours in the “Sea” layer across the entire black to white range. With the sea layer selected, auto normalize the image (Colors->Auto->Normalize). The histogram will now have little gaps in it. As the greys have all been spread out. To fix this, select the non-transparent area (by clicking on the “Sea” layer and selecting “Alpha to Selection”. Invert the selection (Select->Invert) and fill the area with white. Remove the selection (Select->None) and apply a 20px Gaussian blur.

    Note the histogram is now filled in.
    Okay. Yeah, I guess it is: http://i852.photobucket.com/albums/a...histogram3.jpg

    Now the next bit of magic. Set the foreground colour to the darkest water colour (water 5) by clicking on it in the Palette Editor (that we set up at the beginning), and set the background colour to the second lightest water color (water 5) by Ctrl-clicking on it.
    Oops. The tut says two Water 5's. I think the second one should be Water 2 probably.

    Now we will turn the B/W into colour, by clicking Color->Map->Gradient Map, and the water is almost (for now).
    Almost... finished?

    Well, well. Third time might be the charm after all!

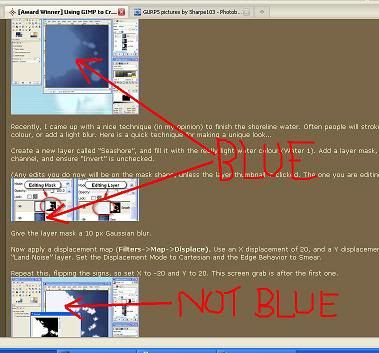
    Repeat this, flipping the signs, so set X to -20 and Y to 20. This screen grab is after the first one.


    This will give a nice wispy, random looking water edge, once the land is put in place…
    Okay, but my land area isn't white like Rob's example pic.

    Now that the ocean is completed, the land can be build up. Create a cop of the “Sea Shape” layer and name it “Grass”. Create a layer mask using the “Land Mask”channel. Click on the layer icon so we now edit the layer, not the mask.
    Should this mask have been "inverted?" All of the others so far have been. I'm going to leave it checked. Well, no, it doesn't say to have it inverted and it always did before so I'll uncheck it.

    Ctrl-Click on the dark green (Ditch) colour to make it the background and click on the light green (high ground) to make it the foreground colours, then Colour->Map->Gradient Map.
    Nothing happened. :/

    Okay, I looked at Rob's screen shot and his Grass layer is on top. I moved mine to the top and the land turned green.

    Here's what his looks like: http://www.cartographersguild.com/at...7&d=1194634418

    Here's what mine looks like:

    Actually, I'm not going to take the time to upload a screen shot as I'm too tired. Suffice it to say, it looks like ****.

    I don't know. I'll start over again at an earlier step.

  4. #4

    Default

    Couldn't sleep. Gotta do this...


    ...I don't get it. I tried again making a map at 500x500 px so just about everything would be the same as Rob's. I get to the same step.

    Now we will turn the B/W into colour, by clicking Color->Map->Gradient Map, and the water is almost (for now).
    Okay. Looks good...

    Repeat this, flipping the signs, so set X to -20 and Y to 20. This screen grab is after the first one.
    But, the screen grab is white. I can't figure out why. Mine is all blue and so is the screen grabs in the tut up until that point.


    Here's what mine looks like: http://i852.photobucket.com/albums/a...URPS/again.jpg

    It's blue and there's no shore line. I just can't figure it out. Probably because I'm super sleepy.

    Now that the ocean is completed, the land can be build up. Create a cop of the “Sea Shape” layer and name it “Grass”. Create a layer mask using the “Land Mask”channel. Click on the layer icon so we now edit the layer, not the mask.
    I copied the Sea Shape layer like the tut says, then moved it up to the top of the layers because Rob's is.

    Mine looks okay so far, not quite as good. If I could figure out what I'm doing wrong on the Seashore layer, it would look much closer to Rob's. Here's a screen shot: http://i852.photobucket.com/albums/a...S/seashore.jpg

    Post 9:Finishing the Land.

    After the bump map we now have this. You can adjust the opacity of the bump map to make it less noticeable if desired:
    I pretty well do, again, except for the coast: http://i852.photobucket.com/albums/a...ttingthere.jpg

    I'm going to keep at this...

  5. #5

    Default

    After the bump map we now have this. You can adjust the opacity of the bump map to make it less noticeable if desired:
    I did. Knocked it down to 43%.

    Merge down the difference layer, invert it, then bring up the layers dialog and adjust it to be a wider band of white on black. This will be used as the layer mask for the dirt….
    Awww, crap! I was blowing through the steps until we got to that dang histogram looking thing again...

    NO idea what this means, so i just moved the three little arrows close together in the middle, kind of like Rob's example pic.

    Go back to the Dirt Layer and add a layer mask, using the “Land Mask” channel. Now right click on the layer mask and select “Apply layer”. This will erase everything that is not above the land.
    Not for me. I was surprised when nothing happened.

    http://i852.photobucket.com/albums/a...notherwall.jpg

Posting Permissions

  • You may not post new threads
  • You may not post replies
  • You may not post attachments
  • You may not edit your posts
  •