


Writing down some steps for making stairs using just semi-transparent gradient fills and meshes (no raster effects), so they can be layered over any terrain. Technique might be useful for others looking to move to vector-based maps. (This is all using Illustrator)
- Set grid to gridline every inch, with 5 subdivisions. This puts the main grid at battlemap 1 inch = 5 feet scale, with one foot squares inside each main square. Turn on snap to grid.
- Make a rectangle object 1" by 0.2" (at scale, 5 feet by 1 foot). Remove the stroke color. This object will be one stair in the staircase.
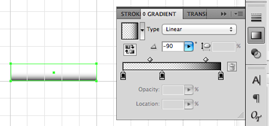
- Set the fill to be a gradient. You want the gradient to start off strong, but fade to nothing quickly. Three points on the gradient, all black: point a: location 0%, opacity 0%; point b: location 40%, opacity 0%; point c: location 100%, opacity 90%[/li]. The diamonds on top of the gradient control where the midpoint of the transition between the two points is. Since a and b are the same color and opacity, there is no transition, so the diamond between them doesn't matter. Put the one between b and c at 75%, which concentrates the more opaque fill at one end.
- With the stair selected, option-shift-drag to duplicate the stair. (Alternately, use the transform dialogs to make a copy 0.2 inches up from the selected stair.)
- Use "Transform Again" (cmd-D) to build as many stairs in the staircase as you need (I made a 10 foot section in this example).
- Select all the stairs you made and group them.
- Set the grid to gridline every inch, with 1 subdivision, making it look more like a battlemap grid.
- You can transform the stairs, such as stretching them along their own axis to make a wider staircase, or rotate around:
- These stairs will be going down, so shadows need to be added to give depth and indication direction. The shadows are a tricky shape, as they need to get darker as you go down the stairs, but also further from the edge of the wall to show that stairs are getting further away from the floor you are leaving. Since the shape is pretty odd, this is a job for a mesh. Make a black rectangle that covers the stairs entirely. Remove its stroke.
- Turn off snap to grid.
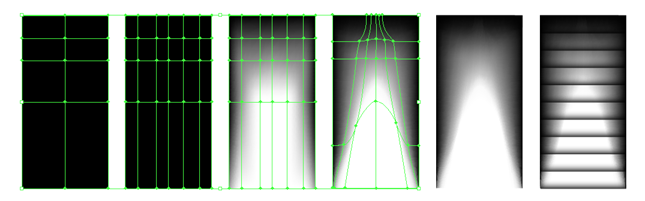
- Select the mesh tool. It is a tricky beast, and difficult to explain. This graphic will show you the results of the next six steps, right next to each other:
- Using the mesh tool, click in the black rectangle to build division points. Click the dead center of the rectangle to divide it into four quadrants. Next, divide the top two quadrants in half by clicking on the center of the line between those two quadrants. Now cut the top section in half again. You should now see what is in the first rectangle of the image above.
- You need some more vertical divisions, so click on the horizontal center line, twice on either side. You now have a mesh with five lines running side to side, and seven lines running up and down.
- At the intersection of each of those lines is a point which controls the fill of the mesh at that point. The mesh will transition between the points seamlessly. Each of these points works like most Bézier curve points, and they can be selected individually with the hollow arrow tool. Select each intersection point and set its opacity (you will keep the color black at all points). Each row has seven selection points. Set them like so:
- All points in the top row should be 100% opaque (maybe 90% or 95% if you want less harsh shadows; we'll stick with 100% for this example).
- The ends of the next row should also be 100%, with all the others set to 70%.
- Third row should be: 100%, 50%, 45%, 40%, 45%, 50%, 100%
- Fourth row: 100%, 40%, 0%, 0%, 0%, 40%, 100%
- Bottom row: Ends should be 40%, the rest 0%.
- Now move the points around to deform the mesh into a shape that creates the shadows you need.
- Deselect the mesh to see how it looks.
- Move the mesh on top of the stairs and check it out. Group the mesh to the stairs. You can play with the point positions and values to tune the mesh.
At this point, you have an overlay which makes any underlying material look like a decent approximation of stairs, vector style. Throw some different materials underneath to see how they look:
Sometimes, you need to tune the fills and opacity and such depending on the underlaying material. Looking at the examples above, the gradient used for each step may be a little too tight, for instance.


 Reply With Quote