Part 3: Using the Discombobulator/Finding Scripts :
This will hopefully be the easiest thing to learn. First though, you will need to learn how to get into scripts in blender. I will start with that.
1) See that little box in the corner of the button screen? Click it. A window should now pop up that is titled at the top, Window Type. Change the type to Script.
If your buttons screen turned out looking like that last picture, then congratz
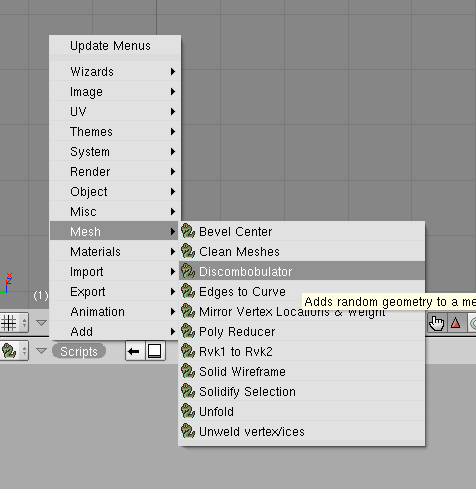
2) Now to get to the Discombobulator. See the word there that says Scipts?? Click that, and a dropdown menu (or just a menu) should appear. On it, go Mesh--> Discombobulator. The Discombobulator menu should now appear.
Looks confusing doesnt it? Well, its not really that confusing. Im going to tell you the basics about using it, but if you want, there is a website with a mini tutorial for the Discombobulator, and I suggest you look at that to learn the basics of what is what and what does what. Here is the link:
http://www.nccn.net/~w_rosky/evan/ev.../tutorial.html
If you dont read all of it, you wont understand a word of what Im going to say.
How to get the best looking Greebles:
1) You may be asking now "What the *@#! is a greeble???", or "What is he talking gibberish for?". Im going to explain. A Greeble is the name given to the cool little protrusions that are on things like spaceships, imperial star destroyers, the like, that you are going to create using the Discombobulator. Occasionally, Greebles are called something like Nurnies, but I prefer the name Greebles.
2) Now here is how to get the best result using the Discombobulator.
Face: Unless you want your model completely and totally engulfed in Greebles and Doodads (the protrusions that are usually on top of greebles. You should know what they are if you read the tutorial link i gave you), then I suggest you set the face percentage to 80% or less. Stuff like wings I prefer to have the face percentage set to 90%.
Min/Max Height: These are tricky. You might be thinking "Oh, Ill just skip this and put in a Min height of -4 (for an inward greeble) and max height of 25 for some tall towers". Bad idea. The max/min height is set up so that 4 is about the same as 400, and 25 about the same as 2500. You will most likely want to use decimals for these. I suggest using nothing nothing less than -0.20 and nothing more than +0.20.
Min/Max Taper: These you can set to whatever you like. 0 Taper is basically a cube, and 100 taper is a pyramid. I like to set the Min to 0 and the Max to 100, that way I get a pretty good range of taper.
Number of Protrusions/Select Tops of: I dont really have any clue what these do, but I just keep them all selected.
Also, I suggest that you keep the Make Protrusions box checked (or chosen), and the Only Selected Faces and Deselect Selected unchecked (or unchosen).
For Doodads:
I suggest having a Min ammount of 0 and a max ammount of 6, but the rest are I suggest you having like just below the ammount of the same type you have for the protrusions. So if you have like a Face % of 80%, then for doodads make it at least 75%. Also, keep play around with which boxes you want chosen, but I like to keep the 1-3 box boxes checked, along with the L S and T ones checked, and Make Doodads, only selected tops, and only on protrusions checked. The rest I leave unchecked.
The rest you can leave, or experiment with. Also, be sure to uncheck the Copy before Modifying box unchecked, as that messes it up and you would have to go back and do it all again. Also, be sure to have your mode in Object Mode and to have an object selected.
When your done, hit the Discombobulate button, and after a short wait, you should have your Greebles. Heres what your spaceship should look like:
It may take some experimenting to get the hang of it, but after a while you may be able to use the discombobulator with your eyes closed
Be sure to keep experimenting, and if you accidentally do something wrong while using the discombobulator, then just hit Cntrl+Z to undo it.
Hope you enjoyed
Bryguy.
Note: I may at a later time put more blender tutorials here, but for now, enjoy


 Reply With Quote