and set the blend mode to multiply. Then add a third layer (remember the TLS) as a clipping layer, and use the levels dialog to bring it down to show the mountains you want Here is the screen showing the three layers

 Reply With Quote
Originally Posted by RPMiller

I think it is entirely acceptable when you get frustrated!


Pardon for the slow reply.
When I first began to read this I got lost because all of the sudden the blurry shape of the mountain was already done, and I'm not sure how he actually made it.
This is what my lap looks like currently.
A little noobish I know, but I'll get better with practice.

FEAR NO EVIL
I think it is entirely acceptable when you get frustrated!
My Finished Maps
Works in Progress(or abandoned tests)
My Tutorials:
Explanation of Layer Masks in GIMP
How to create ISO Mountains in GIMP/PS using the Smudge tool
----------------------------------------------------------
Unless otherwise stated by me in the post, all work is licensed under a Creative Commons Attribution-Noncommercial 3.0 United States License.
Would a short video using your existing landform help? If so, let me know and I will "try" to bang one out tonight (though it may be somewhat largish in the 50MB range)
My Finished Maps
Works in Progress(or abandoned tests)
My Tutorials:
Explanation of Layer Masks in GIMP
How to create ISO Mountains in GIMP/PS using the Smudge tool
----------------------------------------------------------
Unless otherwise stated by me in the post, all work is licensed under a Creative Commons Attribution-Noncommercial 3.0 United States License.
Hi-
I read through the steps, and am not sure what you mean above... "the blurry shape of the mountain was already done"...
Go through a step at a time and tell me where things are different than in the tutorial, ok?
-Rob A>
My tutorials: Using GIMP to Create an Artistic Regional Map ~ All My Tutorials
My GIMP Scripts: Rotating Brush ~ Gradient from Image ~ Mosaic Tile Helper ~ Random Density Map ~ Subterranean Map Prettier ~ Tapered Stroke Path ~ Random Rotate Floating Layer ~ Batch Image to Pattern ~ Better Seamless Tiles ~ Tile Shuffle ~ Scale Pattern ~ Grid of Guides ~ Fractalize path ~ Label Points
My Maps: Finished Maps ~ Challenge Entries ~ My Portfolio: www.cartocopia.com
I got it working never mind.
I had to go back to the first part of the tutorial to make my mountain range.
sorry >.>
FEAR NO EVIL
Let it be known that even a noob can make maps with this guide.
I skipped some stuff since I'm just plain tired of not knowing how to do everything, (I'll get the hang of it later.)
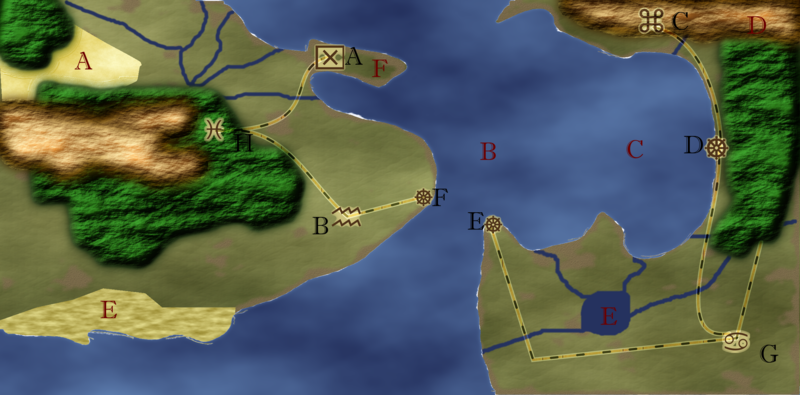
Heres my improvised map with a key:
(ignore anything that sounds too weird. Its for my rpg.)
Index
I. Cities(Black)
.....A. Rubious
......B. Cyclos
......C. Generia
......D. Levitha
......E. Solovis
......F. Tritam
….G. Dissidia
….H. Cryous
II. Geography(Red)
.....A. Sinking Desert
.....B. Hyperian Sea
.....C. Gulf of Celestia
.....D. Celestia Mountain Range
.....E. Eos Lake
.....F. Dolphin Peninsula
.....G. Phoenix Beach
III. Special Locations ()
I.Cities
A. Rubious: Emissary city for the fire nation, Ember. A place where any Ember native will be reminded of his/her home country. Found on dolphin's peninsula, it's a rather exciting place. Flamboyant colors rule the streets and parades are monthly. Rather suiting for the typical wild nature of A fire soulston wielder.
B. Cyclos: Emissary city for the wind nation, Aeria. Its elegant buildings almost seem aerodynamic, like the city might lift itself of the ground. Found on the Great Planes where the breeze passes periodically. The people here might seem rather mysterious, but the city recieves plenty of travelers looking for exotic items.
C. Generia: Emissary city for the earth nation, Harthen. Home away from home. Found on the great Celestia mountain range. Usually a buzz of miners, hard workers are a dime a dozen. Many crystals and ores are constantly brought from within the mountain range. Even soulstones are found on rare occasions, probably left behind by careless travelers. The city is filled with hearty Harthenians and the occasional band of petty thieves.
D. Levitha: Emissary city for the water nation, Aquarius. Found near all the region's most important port cities. The best sailors use their soulstones to gain extraspeed on the dangerous deep waters. Also home of the best fishers. Thanks to their control over water, taking water from the fish is an easy task. The people here are gentle faced. Although they have a very simple look in their city, they do not lack in technology. Their always searching for the fabled city of Atlantis under the Hyperian sea.
E. Solovis: Directly across Tritam, this dea treade route is the quickest to travel from Celestia to Drome and viceversa. Solovis has been known to have smugglers trying to sell unathourized merchandise in Celestia.
F. Tritam: It is considered the older brother of Solovis. Though not as corrupt it, it represents Solovis on a much larger scale. This port city is home to the finest goods from Drome.
G. Dissidia – Capital of Celestia
H. Cryous – Capital of Drome
II.Geography
A. Sinking Desert: This desert is rumored to swallow anything brave enough to step on it. Scientists have observed it and their final analysis was that the whole desert was made of quicksand. Once a thriving forest it was drained of all its riches by the Drome government.
B. Hyperian Sea: A sea not unlike any other. Its fauna thrive in crystal clear water and the great coral reefs. Of course this sea where various lake monsters have been "spotted". Rumor has it that these lake monsters were born from soulstones of seamen that never went through a proper burial. Therefore never entering the lifestream. It also offers the most direct route between Celestia and Drome.
C. Gulf of Celestia: Gulf busy with fishermen.
D. Celestia Mountain Range: Huge mountain range in the north of Celestia. In it there are plenty of small dwarf mining villages along with the dangers of the mountain.
E. Eos Lake/River: Thousands of years old, this lake is nothing, but water. Thanks to Celestian care the lake has survived this long with very few contamination of the lake itself. Eos river flows into Eos lake from the Celestian Mountain Range and then flows back out to empty itself in the Hyperian sea.
F. Dolphin Peninsula: Strangely representing a dolphin, archeologists have searched for many reasons to why the peninsula is shaped by so. Coincidence or man made?
G. Phoenix Beach: Although the name seems attractive enough to draw tourists upon tourists, the heat in the beach is infernal. Usually the only creatures that manage to survive there are Seraphines with a former fire soulstone.
FEAR NO EVIL
Violation... Lakes will rarely have two or more outlets and over time one will win out and the other one will run dry. Fix that up and you have a nice start..
My Finished Maps
Works in Progress(or abandoned tests)
My Tutorials:
Explanation of Layer Masks in GIMP
How to create ISO Mountains in GIMP/PS using the Smudge tool
----------------------------------------------------------
Unless otherwise stated by me in the post, all work is licensed under a Creative Commons Attribution-Noncommercial 3.0 United States License.
I have a special lake? lol
I pretty much need the multiple outlets for the rpg.
FEAR NO EVIL


This is actually quite nice for a first go. It seems to me that the tuts helped and you certainly understand the process...now to go forth and tinker with it and create your own style is the challenge. Nice job.
If the radiance of a thousand suns was to burst at once into the sky, that would be like the splendor of the Mighty One...I am become Death, the Shatterer of worlds.
-J. Robert Oppenheimer (father of the atom bomb) alluding to The Bhagavad Gita (Chapter 11, Verse 32)
My Maps ~ My Brushes ~ My Tutorials ~ My Challenge Maps
After giving the tut several shots, I have come here to vent my frustration and/or cluelessness (?)......
I have followed the tutorial step-by-step, trying to make sure I haven't missed anything, and yet I run up against the same stone wall time and again. Everything goes more or less peachy until I get to the "grass" level; when I apply the gradient map, the thumbnail shows the color layer, but the main window doesn't. If I start hiding layers, the color finally shows up, but goes away again as soon as I make the other layers visible again. There must be something that I'm missing, but I cannot figger out what in billy-blue hell it is. Has anyone else had this cunundrum? Or am I hallucinating?
 Posting Permissions