What happened to these tutorials? I viewed them a few weeks ago and now I get a 404 Error when I go there. Does anyone have these saved in any format?


What happened to these tutorials? I viewed them a few weeks ago and now I get a 404 Error when I go there. Does anyone have these saved in any format?

beautiful map, thanks
Fantastic tutorial. I'm a novice photoshop user, but the step-by-steps are very easy to follow. I tried it out and in mere 2 hours I've made a good progress and even made a few modifications of my own.
http://i1221.photobucket.com/albums/...Shrine-Cip.jpg
Thank you again, jezelf.
Just checked and it saves to the current folder so if you have installed it to C : \ Program Files\ViewingDale then thats where the saves go to. Its a single .exe so you can take the app and put it where ever you want and run it from there. Or you could create a (or modify the desktop) shortcut and edit the current directory for it. I think that should put the saves in that place too. The intention was to put the InstantIslands and the DragonFlight in the same dir and then run II, save a terrain out and then run DF and then you get the 3D view of the island terrain in one shot.Originally Posted by jezelf

Hey that is great, RobA. thanks for that link. Doh it's such an easier techique! I'll amend or add it to my tutorials - or link to it or something (I'll give yer a credit) if don't mind me doing that? It should save people time -especially when going from their sketch.
thanks!
I'll agree it is easier, but it doesn't give the same control your way provides...
Feel free to link away
-Rob A>
My tutorials: Using GIMP to Create an Artistic Regional Map ~ All My Tutorials
My GIMP Scripts: Rotating Brush ~ Gradient from Image ~ Mosaic Tile Helper ~ Random Density Map ~ Subterranean Map Prettier ~ Tapered Stroke Path ~ Random Rotate Floating Layer ~ Batch Image to Pattern ~ Better Seamless Tiles ~ Tile Shuffle ~ Scale Pattern ~ Grid of Guides ~ Fractalize path ~ Label Points
My Maps: Finished Maps ~ Challenge Entries ~ My Portfolio: www.cartocopia.com
Hey Jezelf,
I love the tutorials but I am having some trouble duplicating the blurred color effect. No matter how much I seem to blur the colors there is always a hard edge to them (even when duplicating your colors exactly). Could you walk me through this process a little more thoroughly?
Currently I have only the "extra color" layer selected, the green land layer is not selected, is that my problem? If so, how do you keep from blurring out your coastline?
Thanks!
Had a play about in PS. It can be done. Might be able to to do a video tutorial using that technique then feeding it through wilbur and ending up with the relief map I've done. still testing but might be able to get the whole process down to 10 minutes (real time)
cheers
Hi Azurecrusader.
Sorry to hear you're stuck. (But this will help me refine the tutorials for others)
can you say which tutorial and step you are at? Is it colouring the map? at step 1.6 - 1.8??
From what you mention, it sounds to me like you have a duplicate of your sketchy colours. you blur the copy, but the original is still visible underneath, and that would appear as if nothing is happening. make sure that layer is hidden - or delete it if you don't need to edit it.
here are some things to try...
a) Do you have any duplicate layers of the colours you want to blur visible?
You can see in the screen grab on the tutorial I have an an original layer (named sketchy terrain) and a copy (that I named Blurred terrain ), but I turned off the visibility of the sketchy terrain (I kept it only as a back up, it's not really needed) I left the green land one alone so I could change it's hue, colour or saturation if I wanted to - though I didn't, so it's not essential. Having the the blurred terrain colours on a different layer means you can play around with it's opacity to your liking.
(The green land can be any colour, and can be a variety of blurred colours too there is no hard rule.)
b) Have you used your Alpha channel to select the land to blur only that? Alternatively, you can create a new layer not yet worry abour selecting anything, paint over it , blur it, then use your alpha channel to select the water and delete any blurred bits over the water.
c) There is always multiple ways of doing stuff - you could merge everything to do with the land onto a new layer and blur it in one go...
- click on the top layer
- select all (Ctrl+A )
- merge visible layers (ctrl+shift+c then Ctrl+v )
- with this new layer active, select the land using your alpha channel
- Filter > Guassian Blur
- use your alpha channel to delete any blurring on the water area if needed (invert selection)
let me know how you get on. if you're still stuck, you could send me the file, so you could crop your work down to a square to show a problem area no bigger than 500x500 pixel (for file size). I only need to see how your layers are placed, not your whole map, so it can be emailed.
good luck
Jez
Last edited by jezelf; 08-07-2008 at 06:53 AM.
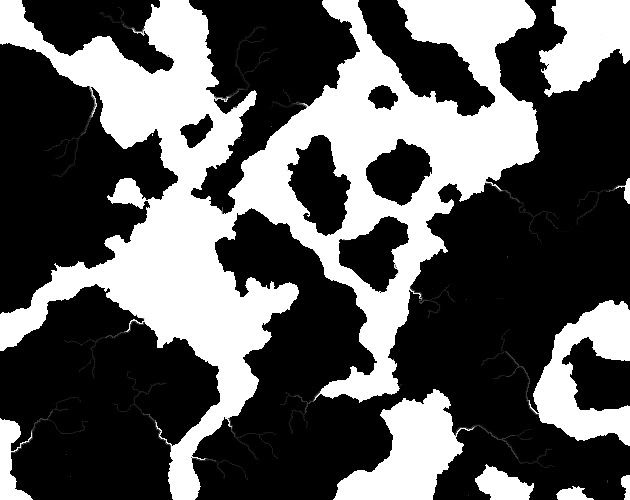
I did the first part of the tutorial where I create my basic black and white / alpha channel map, and this was my result:
The black is land and the white is water.
Now I am on the tutorial "Adding Basic Color to a Map".
You think you could explain this part a little better:
I can make the new channel "Alpha 1". The I duplicate the background layer. Then I am supposed to select all and then copy and paste into the new channel. How do I copy and paste? When I use "save selection", the channel thumbnail is just all white, not a thumbnail of my map.
Thanks for the wonderful tutorial, the end results you got look real nice.
--lanyards
 Posting Permissions

 Reply With Quote


 )
)